

Eric Bangeman
Shortly after the Second World War, a French manufacturer called Solex began selling mopeds. These were not “typical” mopeds that look a bit like a pedal motorcycle: the mopeds manufactured by Solex were essentially bicycles with a small two-stroke engine mounted on the front wheel that could propel the rider on about 100 km in one go. liter of gas mixture. The downside: Solex mopeds were noisy and cumbersome to ride due to the weight distribution, and they never really caught on in North America.
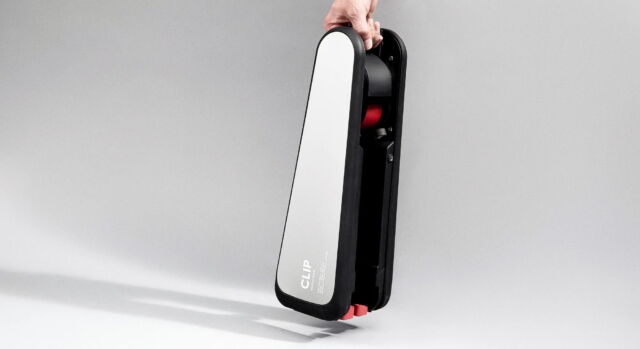
Clip, a startup based in Brooklyn, New York, came up with its own version of the Solex. Its only product, the eponymous Clip, is a friction drive unit that attaches to the front fork of any bike, transforming it into an electric bike. At $499 for the Commuter model and $599 for the Explorer, it’s a relatively inexpensive way to turn just about any bike into an electric bike for a fraction of the cost of a new bike.
Eric Bangeman
Weighing 8.8 lbs (4 kg) for the Commuter model (the Explorer is a pound more), the Clip is in essence a portable friction drive. There is a removable controller that mounts to the handlebars and to the unit itself. The Explorer model, the one we reviewed, has a 192Wh battery that takes an hour to fully charge. Its range is rated at “up to 12 miles,” a pretty accurate claim based on our testing, and top speed is 15 mph. The Commuter model offers half the battery capacity, charge time and runtime.
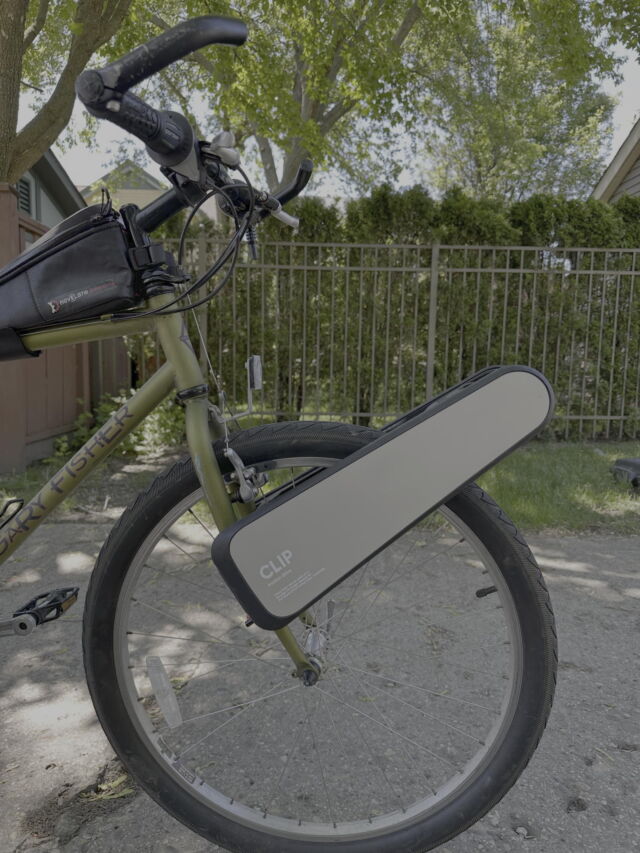
Twelve miles may not seem like a lot, especially unlike e-bikes whose range exceeds 70 miles. But the Clip is not designed for long, leisurely journeys. It’s a tool for people who want to resurrect old bikes that might be gathering dust in the garage. In my case, that bike is a 1997 Gary Fisher Marlin mountain bike that is now only used once or twice a year.
Attach the clip to your bike
The Clip arrived in a box with a single instruction sheet taped inside with a pair of QR codes. One leads to the product manual, but the other has a surprising function: scheduling a one-on-one orientation session with Clip, which is both unusual and fantastic. Mine took about 20 minutes.
Eric Bangeman
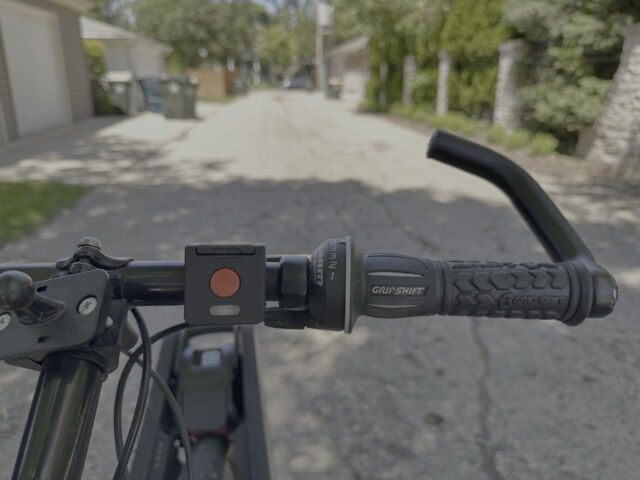
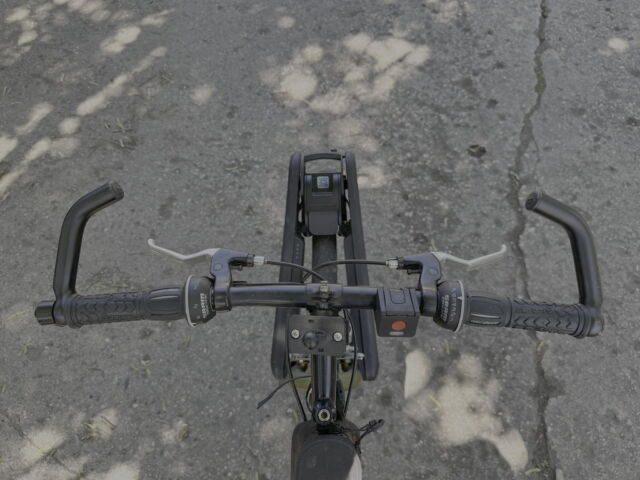
In theory, attaching the Clip to a bike is simple, and it’s pretty easy once you get the hang of it. First, remove the remote from the Clip, which attaches to the bike’s handlebars using a nifty rubber loop. Next, grab one side of the clip, slide the button onto the handle and push the handle forward. Then align the top edge so that it is just below the brake caliper and pull the clip handle. If you’ve done it right, you’ll hear a satisfying click and the Clip’s white battery charge LED indicators will light up. The Clip wheel should now rest on the front wheel of the bike, so congratulations, you now have an electric bike.
Eric Bangeman
Operation is extremely simple. Press and hold the red button to activate friction drive. Press and hold the white button for regenerative braking action. The lack of screens and apps means we have to take their word that the refresh feature can restore 12-18% of the device’s range. In practice, it acts as a discreet brake because it returns the charge to the battery.
Immediately after assembly, I discovered that I had to pedal for a second or two before a button press registered with the Clip. After that it worked like a charm. Positioning the remote near the handle worked best and I gradually got used to holding the button down while pedaling. Remembering to switch to the regen button while slowing down was a bit more difficult.
The extra 10 pounds of gear attached to the front wheel throws off the weight distribution, leading to one or two “whoa” moments on my first ride with this one. If you’re feeling lazy, you don’t need to pedal at all and the Clip will end up moving you along at around 15 mph. Start pedaling and you will feel the Clip increase your effort, unless the road is wet. The Clip works best on dry roads; leave it at home if it rains.
Clip
Once you arrive at your destination, grab the handle, pull it towards you and remove the clip from the bike. Return the remote control to its place and take the clip with you.
There are plenty of e-bike conversion kits to choose from, but I’m hard-pressed to imagine anything easier to install and use. And that’s what makes the Clip such a great product: there’s no need to fiddle with tools, install motors and fit batteries. The Clip literally clips onto your bike and electrifies it. I wouldn’t use it to go to the grocery store because I wouldn’t want to lug the Clip through the aisles. But for quick commutes or short trips, it’s a fantastic way to breathe new life into an old bike.
News Source : arstechnica.com
Gn tech


